

Depicted as Tank No. 106 - Recon Platoon - 1st Regiment , Eastern Front April 1944.
This was built for upcoming 2022 NSW Scale Model Show’s “Panzer Tracks” trophy. It was built straight from the box.
I had a couple of goals with this build. Those being:
• Try multi-colour hairspray chipping
• Figure out how to use Pigments
• Put it on a muddy base
The Kit
- 1/48 T-34/76 Model 1941 Cast Turret
The Build
Construction wise these 48 scale Tamiya Armour kits are
about as simple as build as you can get although I did replace the grab handles
with metal wire.
To get each handle the same width I made a guide with some
plastic spacers. I then bent the wire
over that. To set them to the same
height I used a piece of plastic as a guide.
The Master Tools rotary tool made short work of the large number of
holes I had to drill.

One of the things with these 48 scale kits is that you can see into the hull if you look up . I often add a strip of right angle evergreen and then add some card strips to hide this gap. Given that I usually stick my armour to bases this is a waste of time
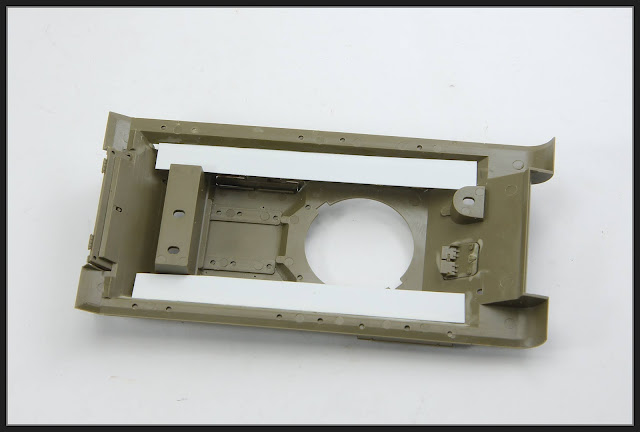
A couple of enjoyable hour’s later construction was
complete. Rather than use the cord in
the kit I used some 22 AWG wire to create the tow wires. I probably won't use both but the other will
be useful as a spare.

I decided to add some more surface texture to the model and beat up the rear fuel tanks. To add the texture I applied the slow setting glue and stippled the model with an old brush.
To beat up the fuel tanks I used the rotary tool and the burr along with the glue to soften the plastic. I also bent and removed some of the fenders

Painting
Onto the multi tone chipping. I have seen Martin Kovacs (Uncle Nightshift on YouTube) do this and thought I’d give it a go.
I first primed the model with a couple of different rust tones. These were mixed from various browns and reds I had lying around.
Then on went a layer of hairspray. Immediately after was the lighter green, (Mr Hobby 340 Field Green FS34097), than the final intended base coat. I chipped this more extensively than what I wanted for the final chipping as the second layer would cover most of it.


After sealing this with a satin coat I applied more Hairspray
then the final green (Mr Hobby 405 Olive Green). I then chipped this much less extensively than the first
layer. I think I needed more contrast
between the green shades. But overall I was happy with how it turned out.
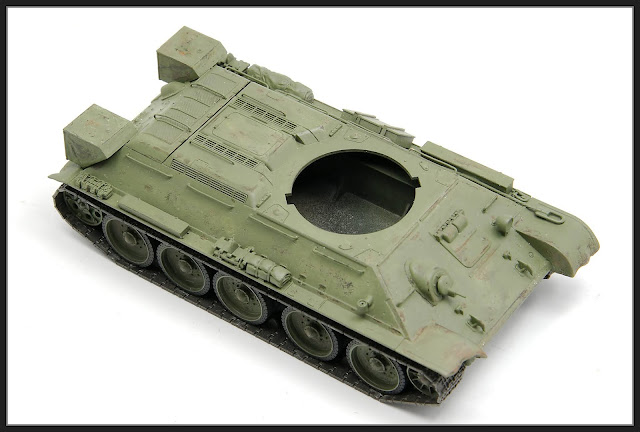

Some detail painting, then a gloss coat was followed by a pin wash. The box was painted with a light Vallejo colour and streaked with oil paint.

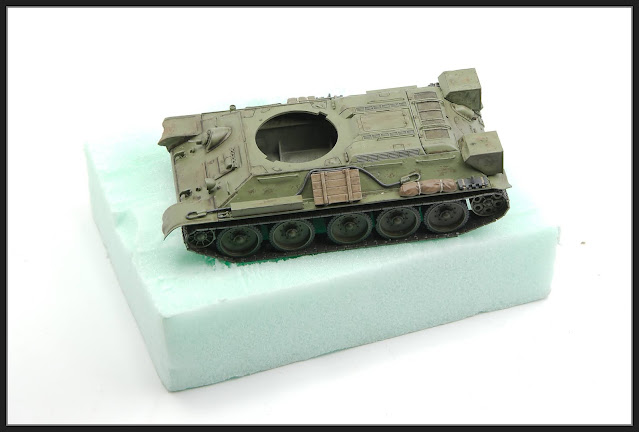
Weathering with Pigments
I’d never really had much success with pigments and I couldn’t understand why. So prior to starting I went and re-read the parts of Mike Rinadli ‘s TANKART 2 where he covers pigment use and application.
I then followed his method, which basically entails making 3 mixes of pigments, a light, mid and darker tone. Then, working in small areas, apply the pigment mixes in layers (from light to dark) and fix them with Tamiya X20A.
I was happy
with the effects on the running gear and lower hull.


I then applied them more sparingly to the upper hull and
turret. Enamel washes were used for some
streaking and splatter marks. In
hindsight I could have stopped here as I really liked how it looked


However I really wanted to try a muddy base so I decided to press on.
The Base
I used a piece of insulation foam and shaped it to get the
contours on the ground. Balsa wood will be used for the sides.
I then mixed up a paste with some Tamiya texture paints and
some Texture paste from the craft shop. What
I didn’t use I placed in a jar for use later.

This was then applied to the base. Prior to this I used some filler to some of the road area that I decided was too deep.

I placed the model onto the base to see how it looked and to try and get the tank treads in the base.


By now I was having quite a bit of fun working on the ground
so unfortunately I didn’t take any further images of the base building process. But, I’ll try and describe what I did.
Once I was happy with the area the tank was travelling over
I used a static grass applicator to grass the respective areas. The tree was an aftermarket item but I
painted the leaves. Some grass clumps
were added.
The tank was then glued onto the base with white glue. Once
this set I used some of left over ground paste to better integrate the tank
into the ground work. Some gloss and
satin paints were used to try and so wetter areas on the tank and the ground
work. Last thing I did was to paint the
Balsa wood sides.
In Summary, I think I achieved everything I wanted to with
this build. The multi-colour hairspray
chipping worked out really well. It’s something I will do again. I am more confident on how to use pigments
now and liked the effects I got before they were pretty much totally obscured
with the mud. Finally, I like the muddy
base, building that as good fun.
The Photos


No comments :
Post a Comment