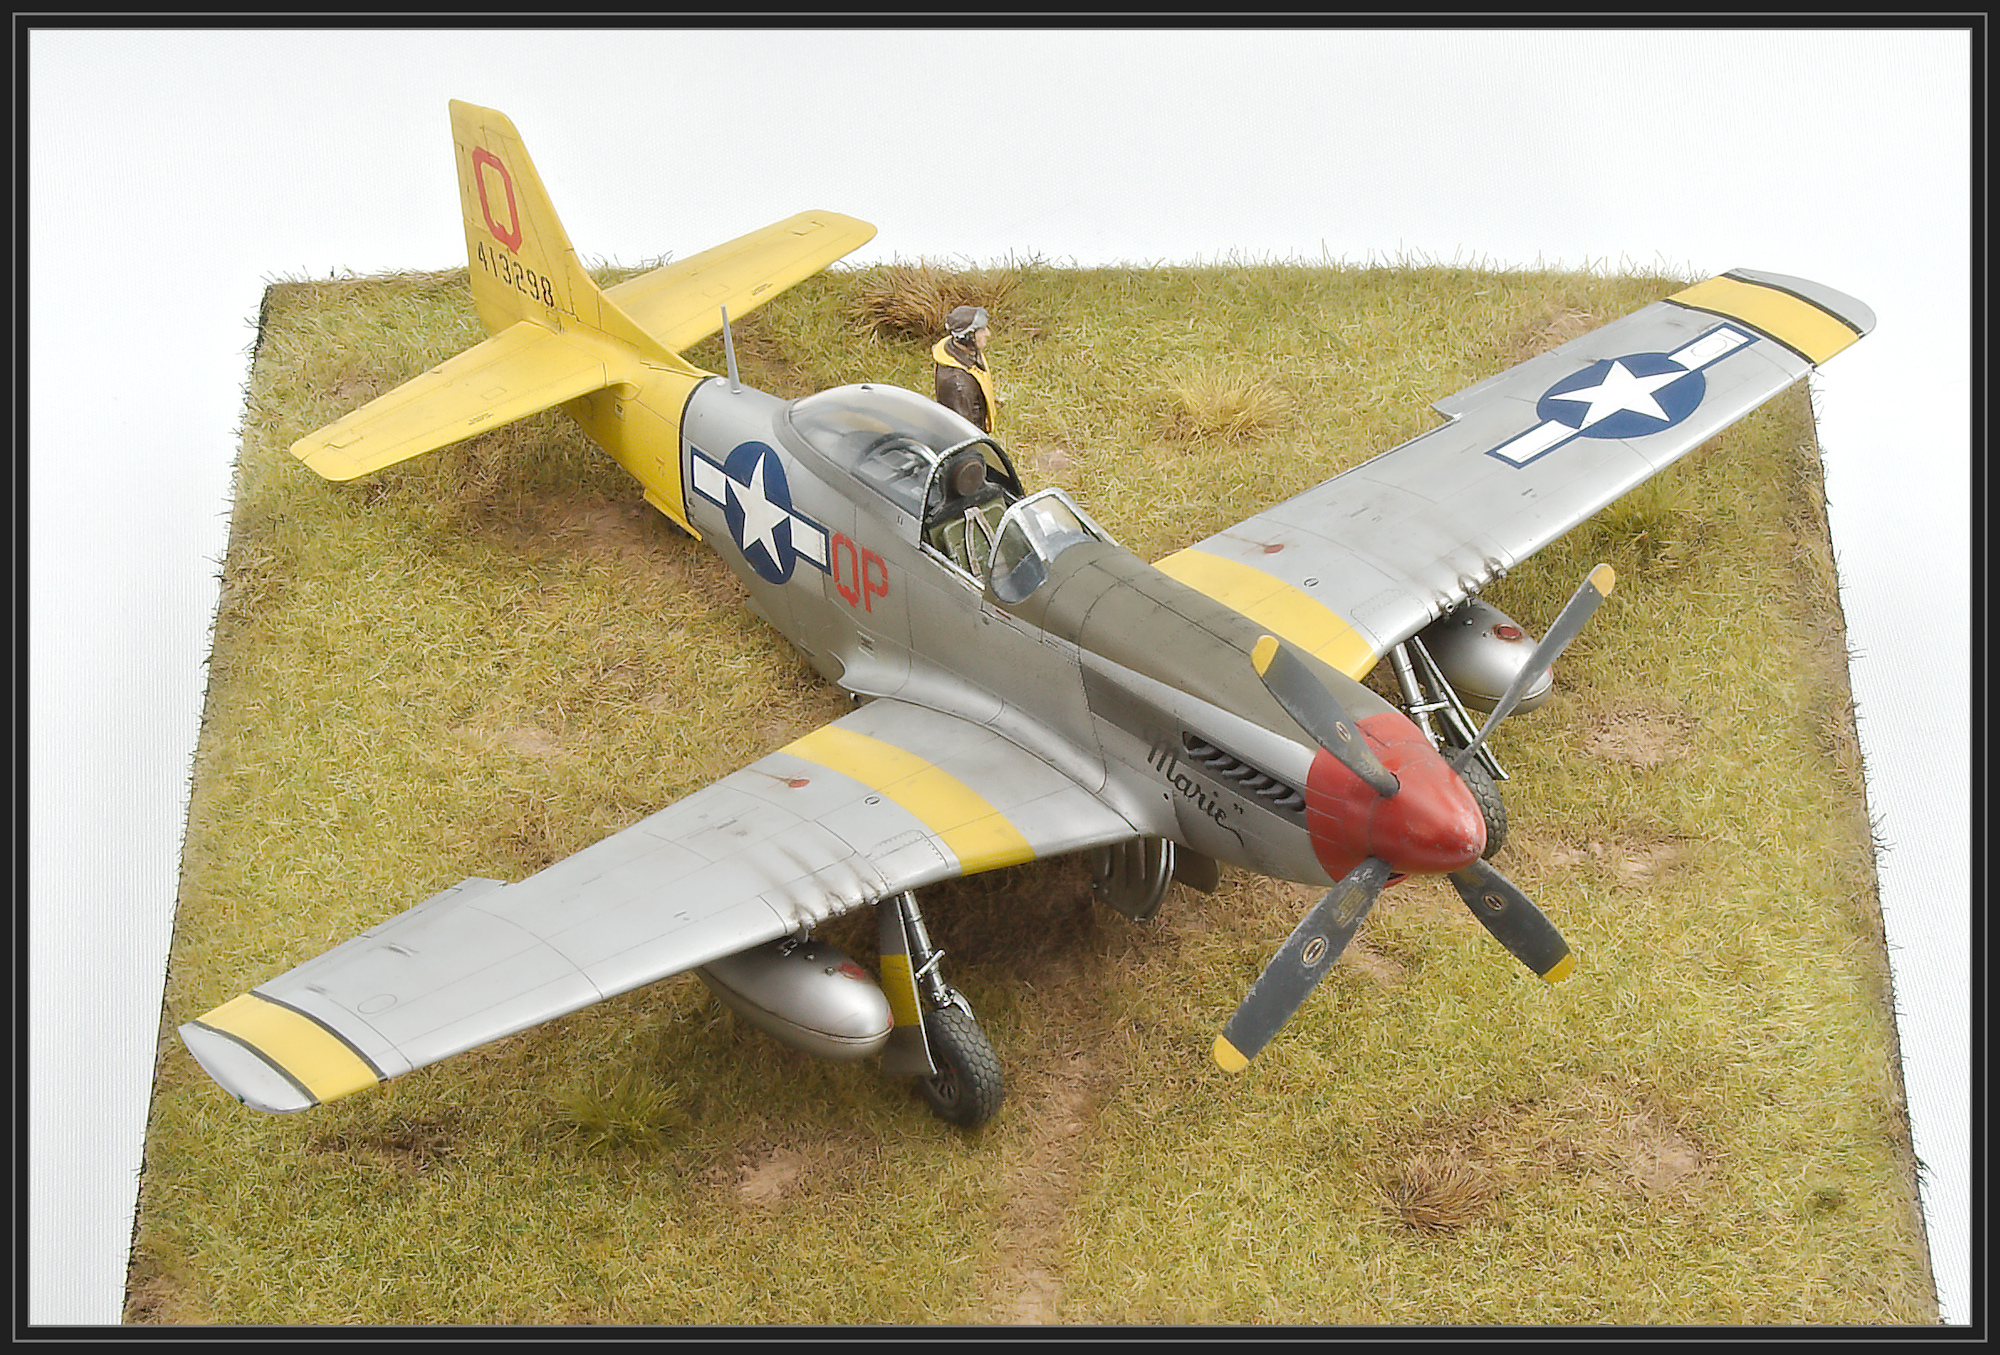
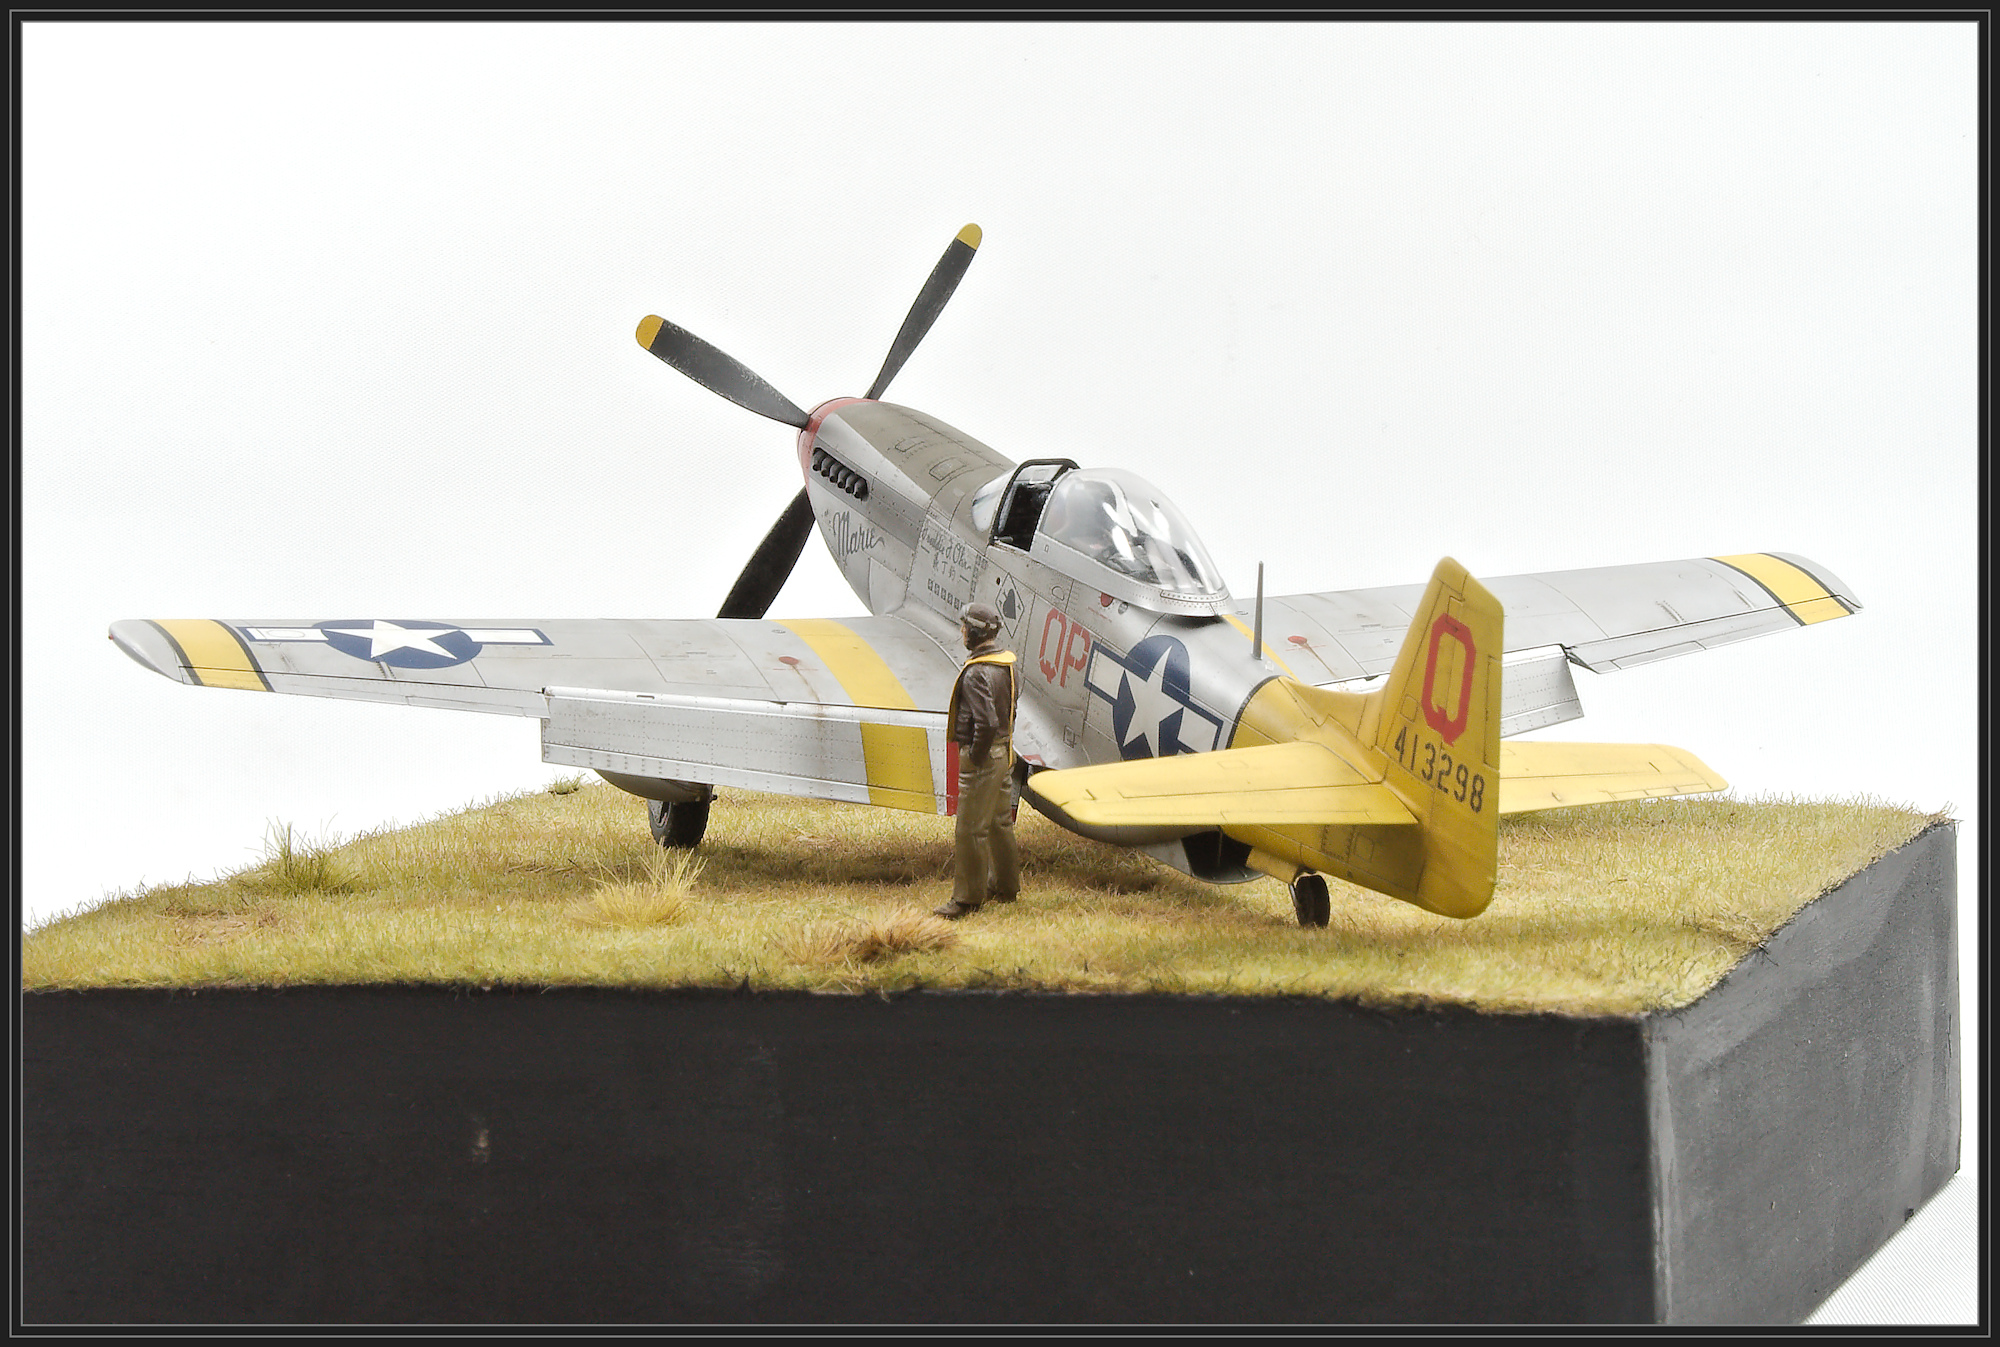
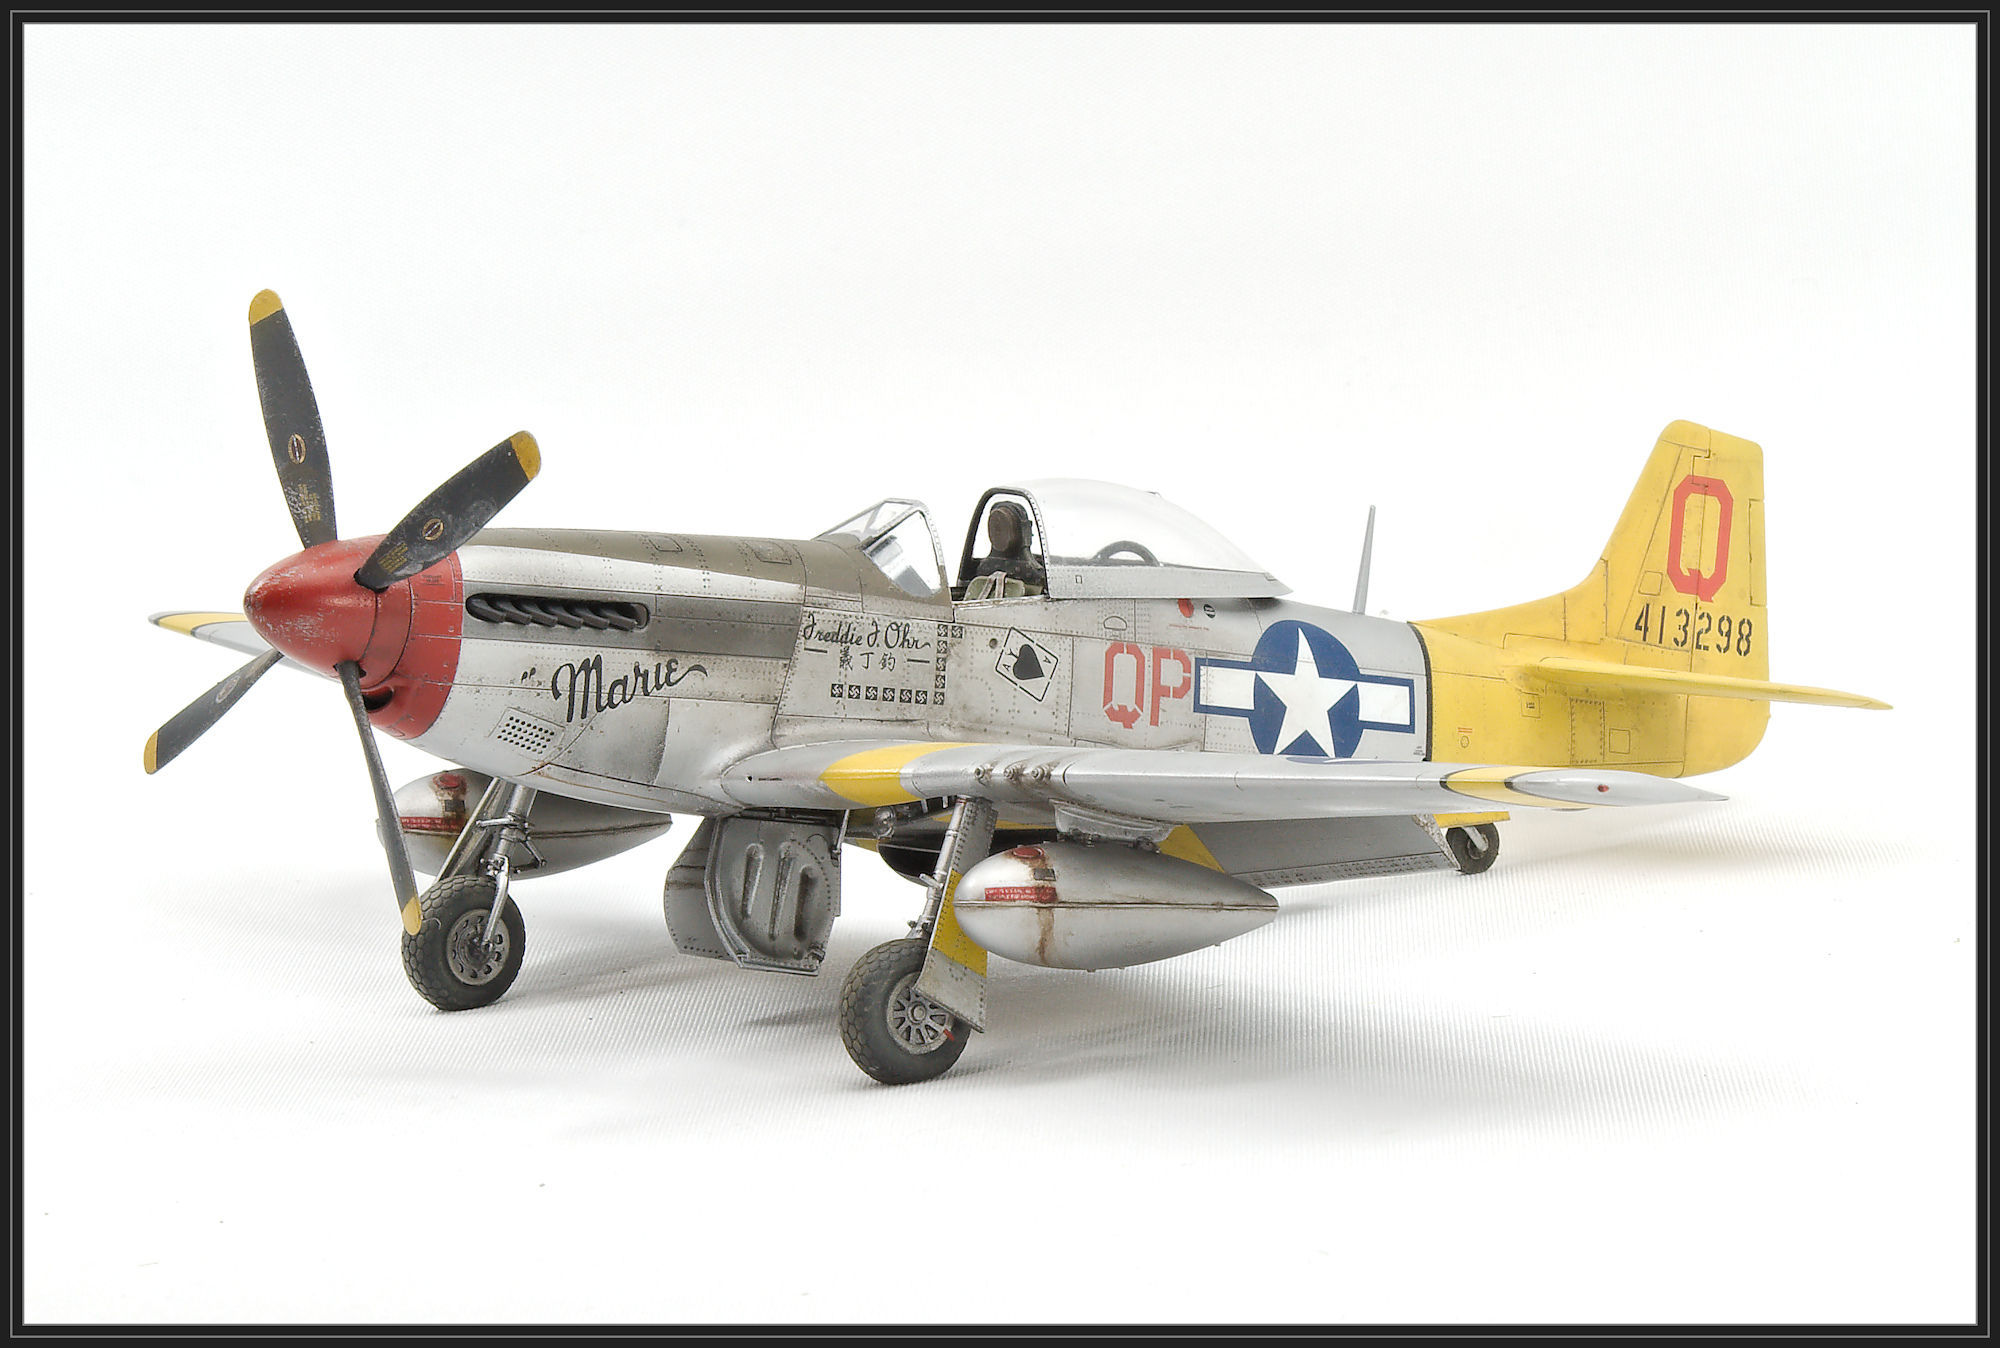
Depicted as P-51D-5, SN 44-13298, flown by Capt. Freddie F. Ohr, 2nd FS, 52nd FG, 15th AF, Madna, Italy, Autumn 1944
This is my third Eduard P-51D. You can see the first here and second here. The third was to be another bare metal aircraft as bare metal is not something I feel I'm particularly good at. I chose this one from from Eduard's Chattanooga Choo Choo Boxing after seeing Spencer Pollards build online.
The Kit
- Plastic from Eduard 1/48 North American P-51D Royal Class Dual Combo
Aftermarket
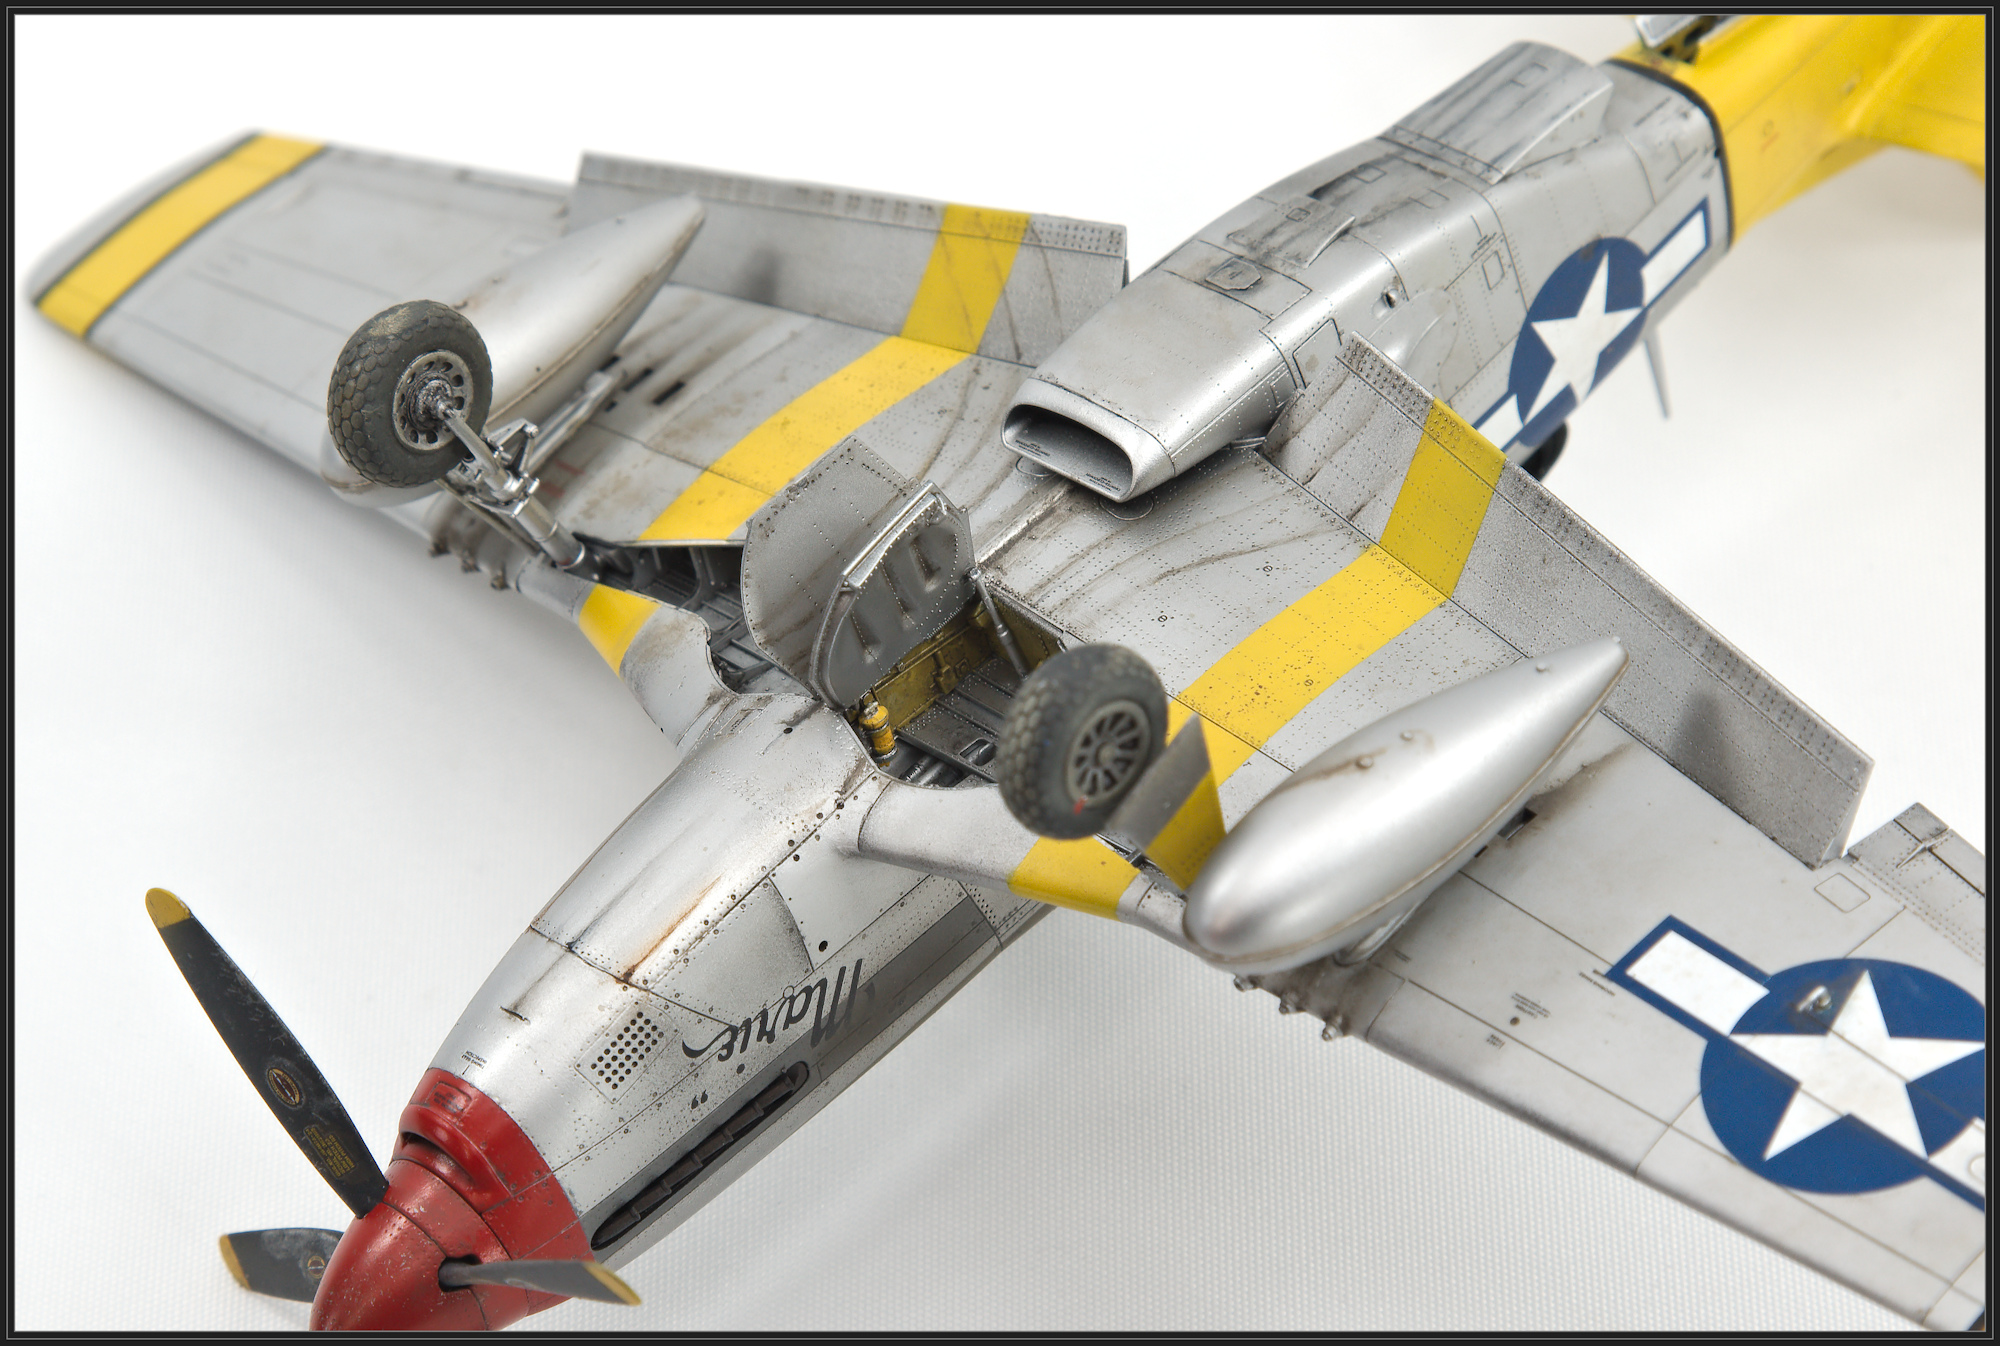
- Eduard Resin wheels (from the Royal Boxing)
- Eduard Resin Exhaust (from the Royal Boxing)
Decals
- Eduard 1/48 North American P-51D-5 (with fin Fillet) Chattanooga Choo Choo
Kit Notes
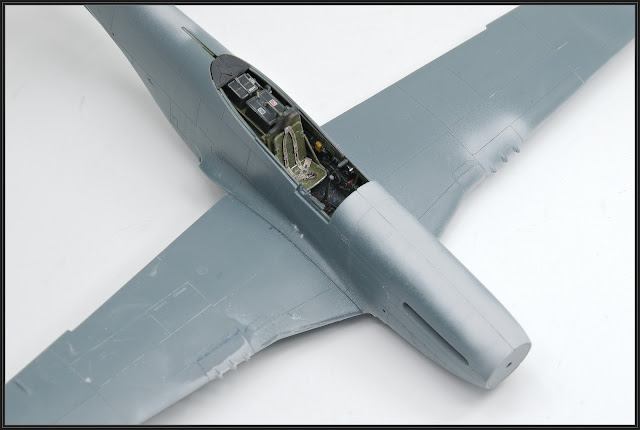
- The Cockpit - Out of the box it's excellent

Data plates are from the Barracuda decal set, I prefer these over the PE. I didn't bother doing much in the cockpit weathering wise as you really can't see much in there once the fuselage is together.
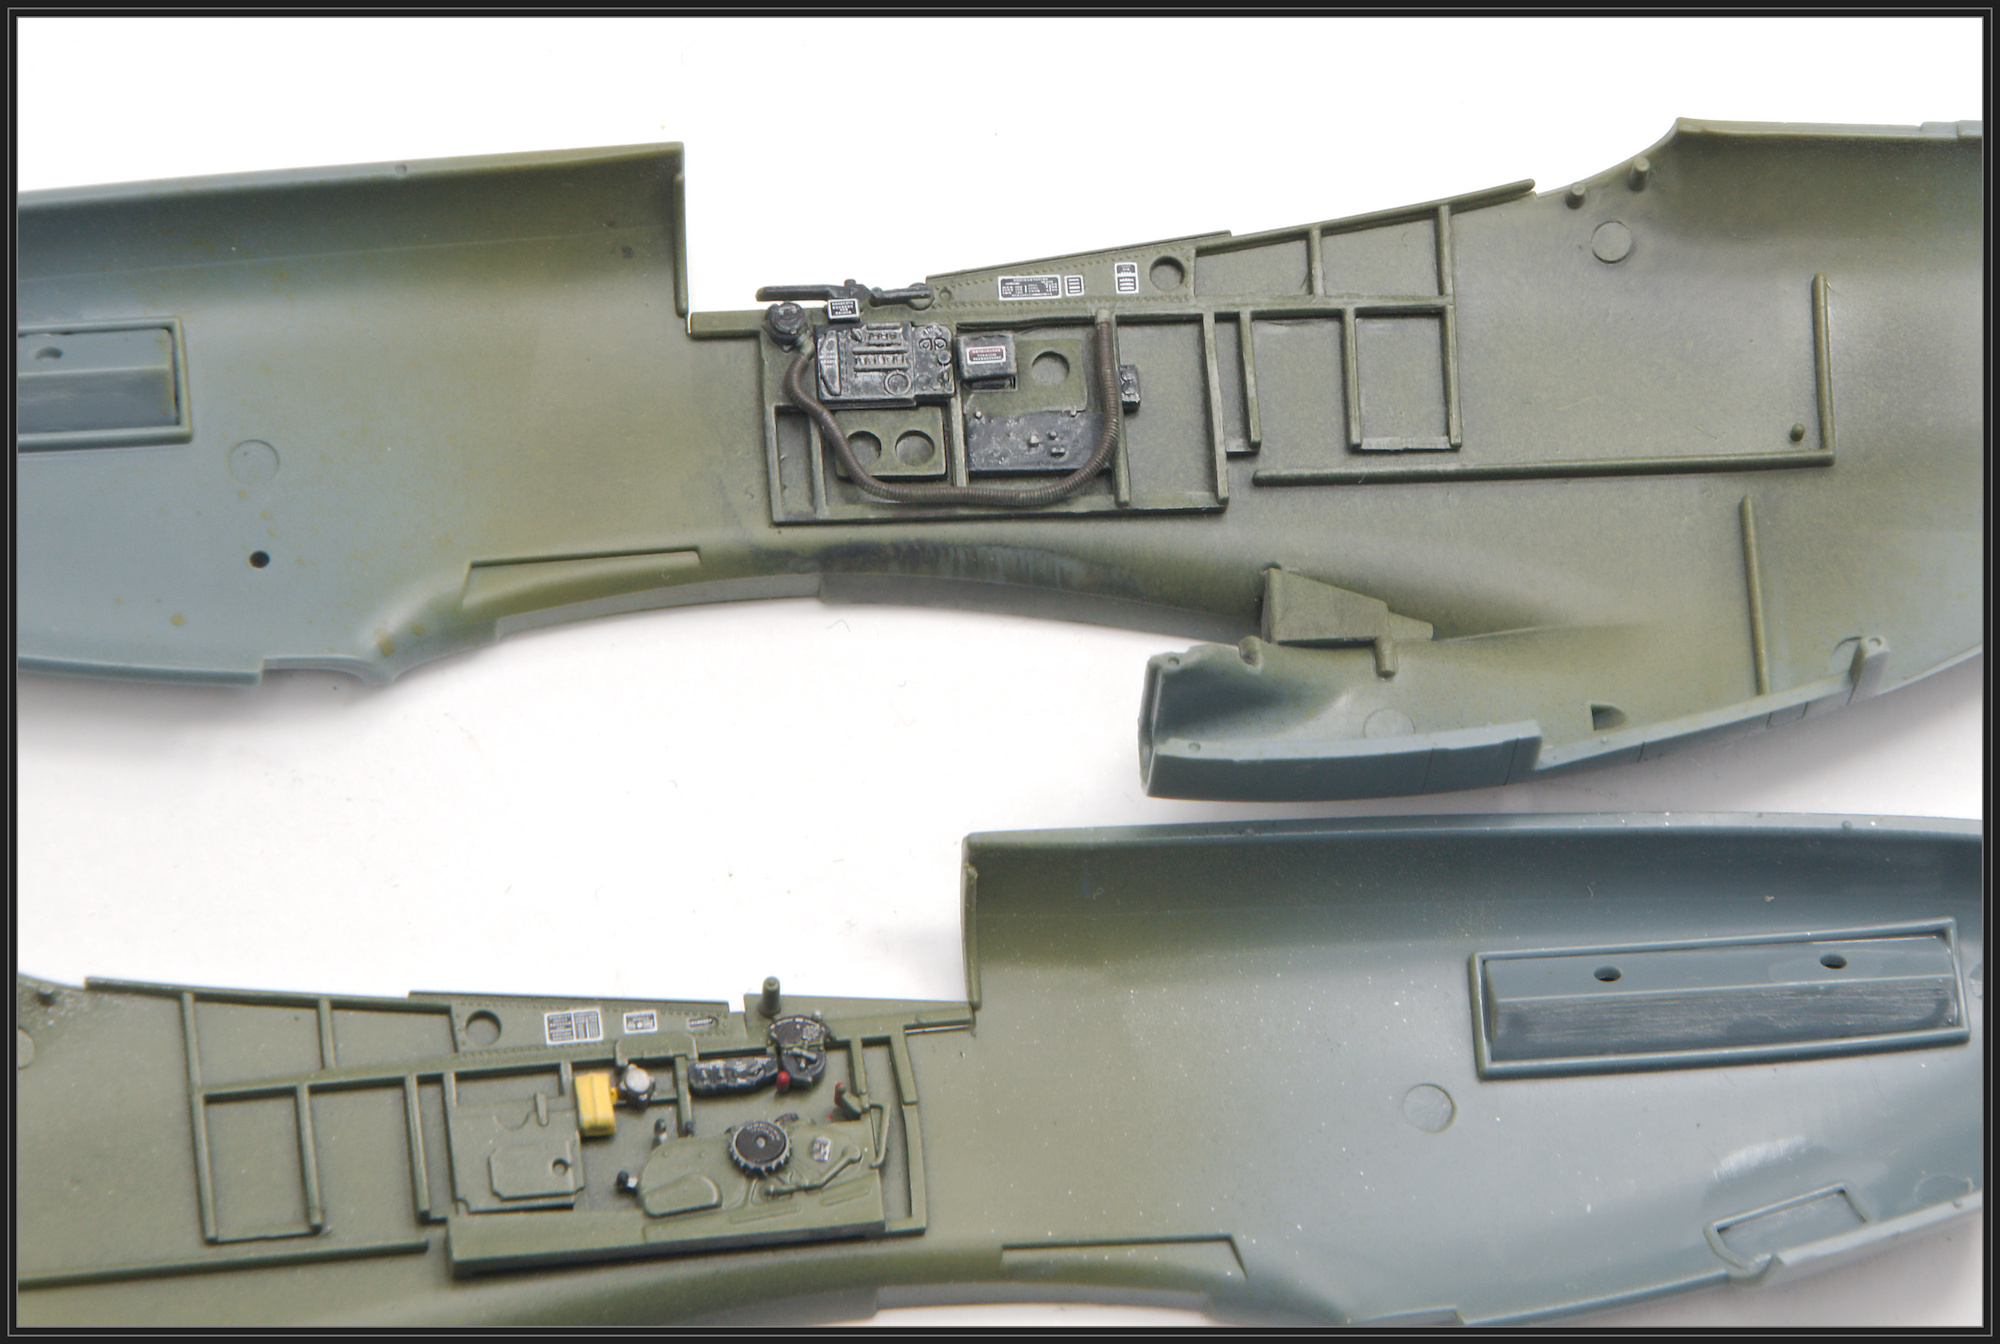
- Gun Inserts - Remove the tiny locating pins and fit tabs to the inside of the wings. You can also bend the inserts to get a better fit.

- Instrument Panel (IP) Combing and Front Windshield – Dry fit the assembly with the IP, IP combing and front windscreen before gluing.
The IP and combing can make the clear piece sit up. I think the Photo etch (PE) IP is the cause as it is slightly bigger than the plastic bit. This seems common with Eduard PE IP’s. - Upper Cowl Join - The join along the top of the cowl is weak. The mating edges, rather than being nice and perpendicular, seem to have an angle meaning you end up with knife edge joins on really thin material. Furthermore, the locating pins are so tiny they are virtually worthless.
In the past I’ve tried flat tabs to provide some strength in this area but this time I figured as the inside of the cowl has a curve so why not use round sprue offcuts. After all a curve to curve join has to be better than a curve to flat surface (which end up on an angle and possibly push up the other half making a step).
Before gluing them to the fuselage half I ran a sanding stick lightly along the outside of the join on both fuselage halves to so the panel line down the centreline of the aircraft would be slightly more pronounced and wouldn’t need re-scribing once the fuselage halves were joined. The off cuts were then glued to one half and left to set for a few hours.
When I came to join the fuselage halves, I run the glue in from the inside so the fuselage bonds to the sprue off cut but not the other half. I used slightly thicker glue as well so it wouldn’t run into under the sprue offcut as much and into the join. - Upper Cowl Detail - The detail is pretty fine and incomplete. I have had rescribe and add the big fasteners on every build. Airfix's cowl design is vasty superior IMHO.
- Centre Wing Structure - Every Eduard P-51 I have built has this thin piece of material deformed. I just cut it off and replace it with Evergreen.

- Main Landing Gear Bay - This is is too tall. You need to sand the top of it to get the top wing pieces to meet at the leading edge, particularly near the wing roots. When doing this don't forget to also consider the fit of the entire wing to fuselage. Again dry fitting is your friend.
- Main Legs Assembly – prior to assembly dry fit the main legs into the main gear bay so you understand how they go together prior to assembly. On this build I couldn’t get them in without removing the small mounting nub. On previous builds I figured out a way to do it without removing the but not this time.
- Main Legs and Eduard's Resin Wheels - If using Eduard's resin wheels sand a bit of the bottom off the main strut, at the top of the curved piece. The Eduard resin wheels seem to be a fraction of a mm larger than the plastic ones so can contact the bottom off the main strut.
Radiator Detail - On the radiator I don’t bother trying to save the detail. I just fill the seam then replace that raised panel with a piece of 0.005” card (Top tip - make the pattern before you sand it, An even better tip - there is a Piece of PE on the PE frets). I restore the rivets with a wheel. Every P-51D has this issue.

- Nose Vents – The pieces for the vents in the nose aren't quite the right profile so need bending and sanding to fit.
- Prop and Spinner – The prop and spinner didn't fit well on this build. I had to enlarge the cut-outs in the spinner.
- Fin Insert - Check this. On this build, one side was a nice fit the other had some wider panel lines and it sat a bit proud of the fin.
- Fuel Tank Radio Area - Follow the instructions to the letter and order when doing this area If you change the sequence this won't fit (I've had to learn this twice).
- Drop tank Attachment - The attachment for the drop tanks is very poorly designed. You really need to pin them .
- Rack Sway Braces - The PE for the sway braces on the racks are fiddly, They look ok when fitted but I'd prefer 3D printed or plastic ones
- Aftermarket Addition's - Consider resin tanks, exhausts and wheels, Eduards resin exhausts are definitely worth it as are the wheels. .


The Paint
- Yellow - SMS LP05 Yellow with a drop of red. I wish I’d not added the red as it has a deeper yellow colour not the washed out yellow I noticed in a reference photo I found after the fact.
- Upper Wings - Mixture of Tamiya AS12 and Light aircraft grey to simulate the painted lacquer on the wings. This was copied from Spencer Pollards build of this subject from Model Airplane International (Oct 2019).
- Fuselage - Mr Color Super Silver 2 as per the instructions with a couple of panels painted neat Tamiya AS 12 (hard to see these in the photos).A
- Area around the exhausts - SMS Steel
- Nose Red - Mr Color Red Mader
- Anti Glare Olive Drab - About 75% Mr Color 12 (Olive Drab) and 25 % Tamia LP62 (Olive Drab 2). The Tamiya LP 62 adds a slight green tinge to the OD which was what I was looking for.
- Black - Gaianotes German Grey

Decaling
Decals on silver P-51's seem to be my Kryptonite. I had a trouble with Miss Steve and I had a bit of trouble here.
The decals were applied straight onto the model surface. The fuselage had a semi gloss coat and the wings a flat coat.
The stencils and national markings are from Fundekals which are Cartograph printed. The aircraft specific decals are from the Eduard sheet. I have 2 copies of the sheet, one appears to be Cartograph printed and one is Eduard printed with the "peel-able film". They are definitely different.
I used the Cartograph ones and they went down well although I ended up with the pilots name and kill marks having a different sheen to the rest of the model. I think this was because I hadn't done my usual wash over the surface prior to decaling.

Clear coats had no effect and nothing I tried could fix it so I decided to remove it. I used normal clear office sticky tape. The decal was obviously well stuck as now I have some filling and blending to do.

I masked the area and sprayed a couple of coats of Mr Surfacer black. Once this dried I sanded it to blend it in. This was repeated before I was happy it was good enough for the silver. Before the silver I restored the rivet lines with a Galaxy Model rivet tool.

I wasn’t entirely happy with the finish so I did some more wet sanding with a 2500 sanding sponge. Another coat of silver was needed... Annoyingly this time the tape pulled off the OP codes. That second decal sheet is coming in handy.

Once the area under the codes was cleaned up and painted silver, I applied a quick oil wash.
A gloss coat was then applied before the Eduard decals went down. The reason for this was simply as I has used a gloss coat under the peel-able decals before when wanting to peel the film.
After the decals set up overnight I decided I wasn’t going to risk peeling the carrier film as the carrier film was virtually invisible. A coat of gloss and it had gone completely. The only issue was the different colour of the codes in each side of the Fuselage. The Cartograph decals were definitely a brighter more vibrant red where as the Eduard ones were a duller red.


Weathering
I sealed everything prior to weathering with SMS Flat on the wings and a 50:50 mix of SMS Gloss and Flat (Semi gloss) on the fuselage.
Various Mr Weathering Color were flicked on the model and then worked into the surfaces with a brush lightly dampened in thinner.
Oils were used for streaking.


Conclusions
Firstly, let me say I really like this kit, especially when it’s finished, but it is one that is quite tricky to build. It’s not a kit for beginners. Having built it (three times), the Tamiya Kit (years ago) and the Airfix kit I think the Tamiya kit is the easiest to build, followed by the Airfix kit. The Eduard kit has the best overall detail but the Airfix kit has some superior detail in places, the cowl being the main one .
The Base
The base is one I'd built for an earlier build. You can read about it here.
The Figure
Ultracast USAAF fighter Pilot - Not much to say except that it is excellent. I use it with many of my USAAF builds.
The Photos