Monday, 26 September 2005

1/48 Tamiya Supermarine Spitfire Mk Vb - No. 485 (NZ) Squadron RAF - Sqn Ldr John Pattison


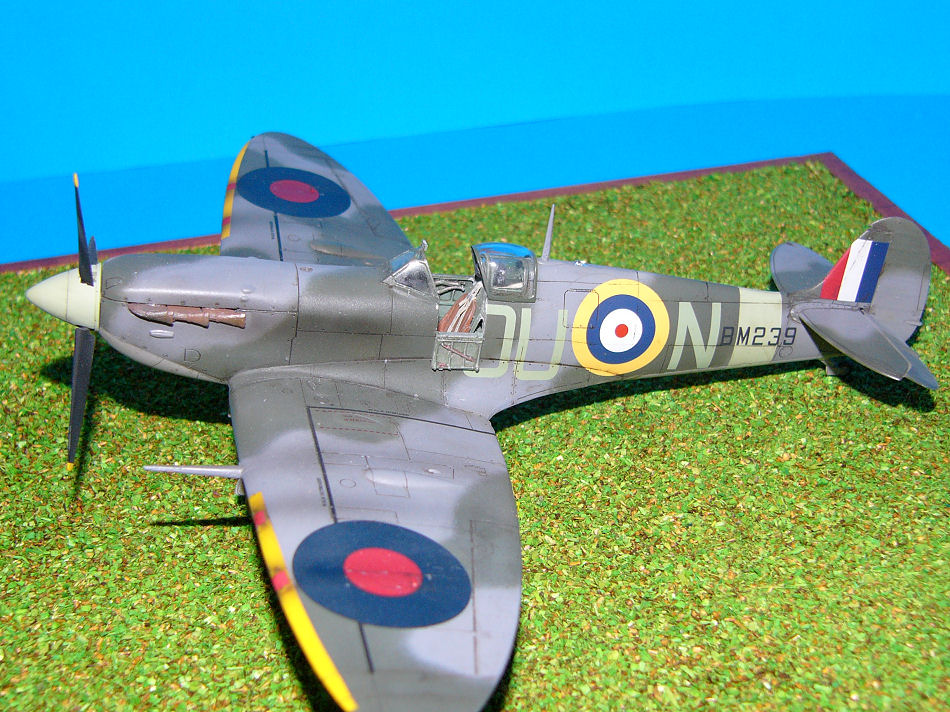
Depicted as an aircraft flown by Squadron Leader John G. Pattison RNZAF , D.S.O. D.F.C. Legion of d'Honneur .

One day I came across this web site and after making contact with the owner I had some photos of Sqn Ldr Pattison sitting in OU-N and provided another photo of a line up of 485 Sqn MK Vb Spitfires, these gave me enough information to build this model.  

The best thing is that this model ended up with Sqn Ldr Pattison and he wrote me a nice letter thanking me for it.


Sqn Ldr Pattison's wartime records is here.

The Kit

  • 1/48 Tamiya Sptifire Vb Kit No. 61033 

The Build

 Like the other Tamiya kit  I have built (Mosquito) it just fell together.In my limited experience Tamiya Kits are excellent and easy for even a amateur like me to build a good model. 

My only minor criticism is the exhausts, so I added the excellent Ultracast exhaust set. I also added some seatbelts made from masking tape, and a piece of solder was used of the tube on the right side of the cockpit wall 

I also dropped the elevators and moved the rudder, this was the first time I tried this and I was happy with the result.

Apart from those details and the custom decals the kit was made straight from the box.

Painting and Finishing

I used Gunze 302 for the dark green, Tamiya 54 for the dark gray, for the undersides I used Tamiya Sky Grey. As far as I'm concerned these are close enough for the RAF Dark Green, Ocean Grey and Medium Sea Gray colours, the Sky spinner was Tamiya Sky. The only acrylics my local shop stock are Tamiya, so this is why I use them a fair bit, plus I find them very easy to use and clean up well with water and IPA.

I did make a major cock-up which forced me to strip and repaint the upper surfaces of the wings, basically this was due to spraying to thin a coat of Tamiya smoke. The model even got thrown against a wall in frustration at this time, but thankfully no damage was done. I did lose the upper set of decals, but fortunately I managed to purchase another set from the Tamiya agent here in Australia.

It was this model that I finally mastered the spraying of Future (or One Go as I use) I applied several light coats of this, let is set for about 4 days or so then applied the decals. I used an oil wash of a mixture of raw umber and black. For the underside I used a dark grey.

Decals

As the kit doesn't have the type A and A1 decals that the 485 Sqn Spitfires used I needed I had to buy some. I used the Xtradecal Sets no's X031-48 (Type A), X032-48(Type A1) and the Tallyho number set.

A flat coat of Gunze Flat was applied and them some weathering with a silver artist's pencil. Another coat of  Gunze Flat was applied and she was done. I also whipped up the mounting base to give me a nice platform to display my most recently finished project.

The Photos


Tuesday, 28 June 2005

1/48 Revell Hawker Hurricane IIC - No. 87 (F) Sqn RAF - September 1942


Depicted as an aircraft operated by No. 87 (F) Sqn RAF Charmy Down, UK September 1942

The Build

This is Revell boxing of the Hasegawa kit in 1/48,I picked it up for $25 in the local toyshop on special.  I also picked up a CDK detail set at a swap meet a few years ago for cheap so I thought I’d have a go it.

 I really picked the wrong kit because the standard cockpit is excellent (minus the seat and Canopy). Well my first impressions or using resin stuff is “Won’t be doing that again” Way to many small fiddly bits for my shaking fingers!. Plus the fit was average. I think I would have made a better job of the cockpit with stuff out of the box. 


I chose the night intruder option in the box because I wanted something different. I had to add the strake in the air intake; I also dropped the flap at the rear of the air intake as most the photos showed this down when the aircraft is one the ground. I also added the exhaust flash protectors as the pictures I’d seen of night fighters/intruders had them fitted. I replaced the kit exhausts with the Ultra cast ones. They look so much better IMHO. 

Painting

It was painted with Gunze 302 for the dark green, Tamiya 54 for the dark gray and flat black underneath. I did the upper surfaces freehand as I like the effect of the feathering that freehand gives but for the black on the rear fuselage I used blue tack to “mask out” the lines as my hands weren’t steady enough, plus I want to try that technique out. It’s not to bad although it’s probably a little sharp for my taste. 
 I won’t be painting flat black on such large areas again, it was very hard to get smooth with 4 of 5 coats of One Go, In fact it was never smooth enough for big decals, thankfully none is required. Next time I’ll paint gloss first then add a flat coat. BTW a thanks to Dave Turner for the replacement decal. ( I seem to ruin one per model)

Weathering

I used oils for the wash, (dark grey underneath and a raw umber on top) and then used silver on a fine brush for the weathering. Many of Hurricanes in the photos I had were very banged up so I added a fair bit of weathering to this one. Not sure if I went overboard. It’s a line I find hard to define.  

Final Assembly

The Aerial is Ezy Line (thanks Phil H) first time I’ve used it and it was a dream, I may even consider doing a WW1 aircraft now.


I used the kit canopy for the front windscreen and went through 2 vacuum canopies for the back part. I really struggled with the painting of this part and I’m still not really happy with it. Even though the kit ones are to thick by scale they are so much easier to work with. Why Hasegawa/Revell didn’t include an open canopy to show of the cockpit is beyond me.


I want to do a Desert Hurricane IID some time in the future so hopefully I’ll remember all thing things I did wrong on this one. All in all though  I’m happy with the final product though, I’d recommend this kit to anyone.

The Photos


Sunday, 27 March 2005

1/48 Tamiya De Havilland Mosquito FB Mk VI 487 Sqn RNZAF


Depicted as an aircraft from 487 Squadron RNZAF that, on the 18th February 1944, flew on " Operation Jericho". In it Mosquitoes of No's 21  , 464 (RAAF) and 487 (RNZAF) Squadrons bombed the Amiens prison to free French resistance fighters being held by the Gestapo.

The Build

This was my first Tamiya kit and WOW, what a joy to build, it went together with virtually no problems (the wingtips being the exception). The instructions are good and the detail in the cockpit and bomb bay is good. If this is representative of other Tamiya kits then I can see why the are around $40 AUD. But I think it is well worth the money. I bought an after market tail wheel and crew door, although only the crew door was really required.


Painting and Finishing

For the paints I used Gunze 309 for the green and Tamiya XF54 (Dark Sea grey) for the upper surfaces and XF 19 )for the underside. To me these colours look pretty good  representations of the the WW 2 RAF colours Dark Green, Ocean Gray and Medium Sea Grey. As I have at least 3 other RAF WW2 fighters to build I think I'll be sticking with them.

The kit was dusted in Tamiya smoke and a final coat of Gunze Flat clear and I'm very happy with the final result. I rate this my best effort yet.

The Photos